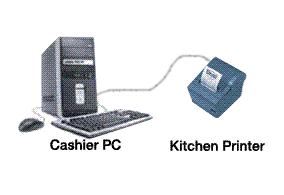
How to connect an Epson
Serial Buffer II card
Overview
 Serial buffer II features a
larger (24k) serial buffer than the standard
serial interface card and is field programmable for port settings. The
Serial Buffer II Module (SBMII) works with the following EPSON printers:
TM-U200/U220 (types D, B, A, and AM), TM-T88II/T88III, TM-H5000II, TM-U325,
TM-U675, and TM-H6000II. Serial buffer II features a
larger (24k) serial buffer than the standard
serial interface card and is field programmable for port settings. The
Serial Buffer II Module (SBMII) works with the following EPSON printers:
TM-U200/U220 (types D, B, A, and AM), TM-T88II/T88III, TM-H5000II, TM-U325,
TM-U675, and TM-H6000II.
Default communication
parameters are: 9600 baud, 8 bits, 1 stop, no parity, and 4K buffer.
Installation Steps
1. Disconnect power and other cables from the
EPSON printer, and remove the printer DIP switch cover plate.
2. Remove the existing interface board from the printer by unscrewing 2 screws.
3. Consider the communication setting options in step 9. If you will be manually
setting the port parameters by jumpers do so before installing the card (see
below).
4.To install the card properly align and push the new module into the printer.
Fasten the two mounting screws through the faceplate of the new interface.
5 Attach the serial communication (null modem) cable from the host computer to
the printer.
6. Set printer DIP switches as necessary; then attach the access cover.
7. Connect the power cable to the printer and apply power.
8. Run a configuration report. This shows that the printer, module, and firmware
are all installed and operating correctly and shows how the communication
parameters are set.
9. You can set the communication parameters of the card using the configuration
utility software or by setting the set of 6 jumpers located directly on the
Serial Buffer II interface card.
Setting the printer's DIP switches when using
Serial Buffer II
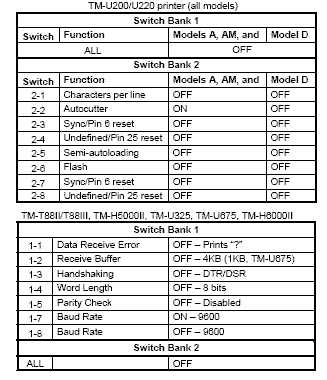
Running a Configuration Report
For the EPSON TM-U200 printer
After the printer is powered on and feeds one line, press the FEED button 3
times.
For all other printers
Power on the printer, open the paper cover, press the FEED button, and close the
paper cover.
MANUAL HOST–MODULE
To set baud rate and buffer
size manually, set JP2 to ON and refer to the tables below.
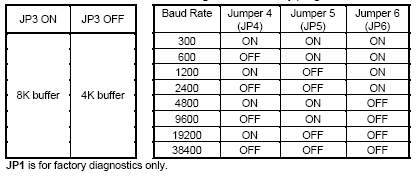
Notes:
JP1 is for factory diagnostics only
When JP2 is ON, the module ignores settings from the utility program
and uses the values set by the jumpers. When JP2 jumper is OFF the
utility program (see below) is used to set the communications parameters.
Utility Program
A utility program for the Serial Buffer II Module
is available for downloading from
the Internet site epson.com.
The zipped file (SBMII Utility.zip) includes the SBM2 utility, which is a DOS-based
menu
program that lets you change communication parameters between the module
and the computer. It also lets you change buffer size. The zipped file also
includes an instruction manual for the utility program, along with an
application
program and a configuration file.
Note: JP2 must be open (no jumper) to use this software.
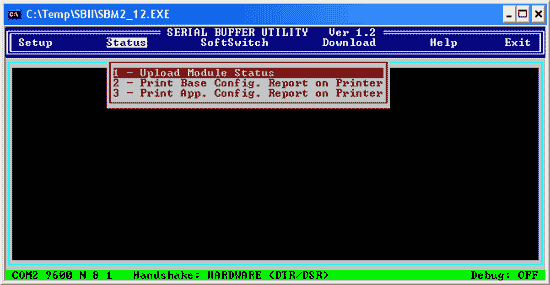
Printing the Serial Buffer II settings
Open the SBM2 utility. Choose 'Status' and "Print
Base Config. Report on Printer". This will print the current settings of the
Serial Buffer II card including data bits. stop bits. baud rate and installed
jumpers.
Getting Initial Printer and
Connect-it Adapter Settings - the Self Test
Print the initial settings of the serial adapter by running the self test. Run the printer self test
by holding down
the feed button while turning on the printer. The printer will print a list of
initial settings including baud rate, data bits, parity, stop bit, flow control
(handshaking).
These values will be needed when configuring the serial port in Windows.
See the main serial interface page
for information on how to install card,
selecting a cable,
install
Windows drivers,
checking
the configuration, testing
the printer.
|
