How to connect an Epson TM Series Wireless Printer
Network Setup
The wireless printer can be "connected" via a wireless adapter installed in
a computer or connected through a wireless router. To connect to your local network the
printer must be set to settings compatible with your network. To set the settings on the adapter you
must first connect to the printer in its current or default state.
Outline of the Process:
-
Determine the settings of the printer
-
Reset the settings to the default
-
Configure a wireless computer or device to talk to the
printer
-
Set the printer to the desired settings
-
Install the printer drivers and install the printer under
Windows
Getting Initial Printer Settings
Get the current settings of the wireless printer by running the printer self test.
To do this hold down
the feed button while turning on the printer. The printer will print a list of
initial settings including SSID (network ID), Mode (Ad-Hoc or Infrastructure),
current IP address (default: 192.168.192.168)
The self test lets you know if your printer is operating
properly. It checks the control circuits, printer
mechanisms, print quality, control software version, and DIP
switch settings.
This test is independent of any other equipment or software,
so it is a good idea that run it when you first set up the
printer. If the self test works
correctly, it suggests the problem may be with the other equipment or the
software, not the printer.
To Run the Self Test
1. Make sure the printer is turned off and the roll paper
cover is closed properly.
2. While holding down the FEED button, turn on the printer
using the switch on the top front of the printer. The self test
prints the printer settings and then prints the following,
cuts the paper, and pauses.
A sheet will print showing the MAC
address, SSID, mode, wireless channel number, authorization
method (None, WEP), Gateway (GW), IP address and IP assignment method.
The network specific settings have been
highlighted above.
Check that the settings are reset by running the
wireless card self-test, above.
|
Parameter |
Initial Value |
Setting Instructions |
|
Network Mode |
AdHoc |
Infrastructure / AdHoc
Use ad-hoc if connecting directly to
a device, Infrastructure if installing the printer on a network.
ad-hoc mode (also
called peer-to-peer) is a method for wireless devices to
directly communicate with each other. Operating in
ad-hoc mode allows all wireless devices within range of
each other to discover and communicate in peer-to-peer
fashion without involving central access points.
Infrastructure mode implies there is a common
wireless access point, such as a wireless router. |
|
SSID |
EpsonNetIBSS |
Set this according to the system (in ad-hoc
mode) or leave
as is. |
|
IP-Address |
192.168.192.168 |
Set the printers IP address.
Notes: The actual IP address chosen should be valid for
your network (the default value probably will not work).
Every device on a network must have a unique IP address |
|
Subnet mask |
255.255.255.0 |
Set this according to your network or use
default. |
|
Gateway address |
0.0.0.0 |
Set this according to your network. Leave
blank if unsure. |
|
IP-Address setting |
Manual |
Auto / Manual. Set this according to the
way IP addresses are assigned on your network. |
|
Use WEP key |
None |
None / 64-bit / 128-bit |
|
WEP Key |
None |
set this if encryption key is used |
|
Channel |
11 |
Channels 1-11. When using Ad-Hoc mode, set
the channel directly. When using in the
infrastructure mode, it is set automatically. |
Resetting TM-60P Printer to Default Values
You can reset the TM-60P printer to the default settings by
following this procedure. This will reset the printer’s
wireless settings
(IP address, mode, security settings).
1. Open the paper roll cover.
2. Turn the printer On while pressing the FEED button.
3. Press the FEED button 6 times.
4. Close the paper roll cover.
5. The reset instructions are printed. (Open the paper roll
cover, press the FEED button once or twice, close the paper
roll cover.)
The reset begins after “Initialize” prints and the paper
roll has been cut. The printer restarts after
initialization.
Note: For the TM-P60, initialization completes 30-60 seconds after the paper roll is cut.
You can then run the self-test to confirm that the
settings have been reset.
Configuring a computer or router to access the wireless
printer
There is no way to change the
network settings on the TM-P60 wireless printer directly. You first must connect to
the printer with a
computer and then change any settings using a web browser or the
Epson TMnet utility.
In most cases this means
that you must first modify your computer's or router's wireless settings to work
with the printer to
make changes on the wireless printer so it can work on your network. After the changes
are made you can reset your network to its original settings.
The wireless printer defaults to:
Ad-Hoc mode, with a SSID of EpsonNETIBSS, IP address of
192.168.192.168 and no encryption.
Tip: It may be less disruptive to configure the wireless adapter
using a different computer or network from the one it is to be installed on.
Tip: If you can't see the SSID of the wi-fi printer (default value:
EpsonNetIBSS) under the wireless network tab of the device you are using to
connect to the printer then check the devices settings (especially encryption
and network mode) and try again or try a different device to see if you can see
the printers SSID.
|
|
-
Turn on the wireless printer
-
Open the
TMNet utility to
access the wireless interface
-
Press the Configuration button to
access the printer
|
Configuring the wireless interface using TMnet |
Configuring a Wireless Router
If you are using a wireless router to connect with the printer:
-
Systems with a wireless router or multiple wireless printers will
want to use the Infrastructure mode with a router.
-
Set the subnet to work in the address range of the wireless
adapter (192.168.191.xxx if using default value)
-
Make sure the wireless broadcast is on
-
Turn off encryption or WEP
-
Turn off firewalls and filtering
Configuring a Computer with a Wireless Adapter
If you are using a wireless adapter installed in a computer to
connect with the printer:
-
Install the wireless adapter on the computer if not already installed
-
Change the wireless adapter to
Ad-Hoc. Open up the Wireless Adapter tab and press Advanced. Then change the
Networks to access to ad-hoc.
-
Change the IP address of the warless adapter you are
using so it can communicate with the wi-fi printer. To do this open the Wireless Adapter
Properties in the Network Connections of the Windows Control Panel. If the
first three numbers of your IP Address are 192.168.192 (assuming the
wireless adapter is set at the default IP address of 192.168.192.168) then
you do not need to reconfigure your computer’s IP Address. If the first
three numbers of your IP Address are not 192.168.192, (Ex. 192.168.1), then
you need to change your computer's IP address to an address in the same
subnet. Change
the IP address to a static IP address. Then make the IP address of the adapter
different than the wireless adapter (like 192.168.192.2). Do not set the
computer to the same address as the IP address of the printer.
-
Disable the computer's wired
network adapter (Local Area Connection) if installed (The TMnet utility
doesn't seem to work when there is also a live wired network card enabled)
Making the Initial Connection
from the Computer to the Printer
If you are using a wireless adapter installed in a computer to connect with
the printer
you can now make the initial connection to the printers.
Open up the View
Wireless Networks in the Wireless Adapter properties.
The printer will be visible as EpsonNETIBSS as an "unsecured computer-to-computer network"
(with the default settings).
Click on the connection to connect to the printer:
This should establish the connection between the
printer and the computer.
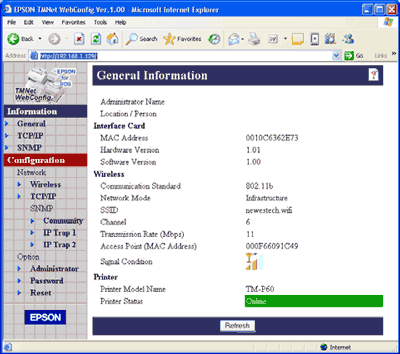
This is the general setup screen of the printer
Verifying the Connection
from the Router to the Printer
If you are using a wireless router then you should verify that the printer
is connected to the router.
-
Turn the printer on
-
Log onto the router administration from a computer on the
network.
-
Check the wireless device status
-
Verify that the printer is communicating with the router by
finding the IP address or MAC address of the printer in the wireless device
connection list on the router. If the device is not listed see the
troubleshooting steps below.
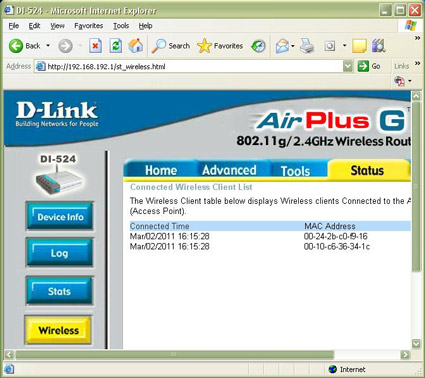
Look for IP or MAC address of adapter on router
Pinging the Printer
You can verify the printer is connected to the computer by pinging the printer from the
computer.
Open up a command window and enter:
ping <IP_address>
where <IP_address> is the IP address of the
printer (i.e. 192.168.192.168).
The printer should reply to ping requests. Repeated timeouts indicate that the
printer is not connected. If the printer does not reply verify the IP address of
the printer and the Ping setting on the
Wireless adapter properties.
Configuring the Adapter with
TMNet
Running the TMNet configuration
utility on the Computer
You can run the TMNet configuration utility on your computer to view or change
the settings on the wireless card. This utility will scan for the wireless
printers on your network and allow you to make changes to the adapter's
settings.
|
To obtain the TMNet configuration
utility from Epson's website:
-
You may have to re-enable your wired LAN
port to download the EpsonTMNetWinConfig utility.
-
Download and Install Epson’s
TMNetWinConfig available from
www.epson.com
-
Click on TECHNICAL RESOURCES
-
Select WIRELESS INTERFACES under the
CONNECT-IT INTERFACES
-
Click the download icon
for the TMNetWinConfig
-
For
detailed installation instructions, click here.
|
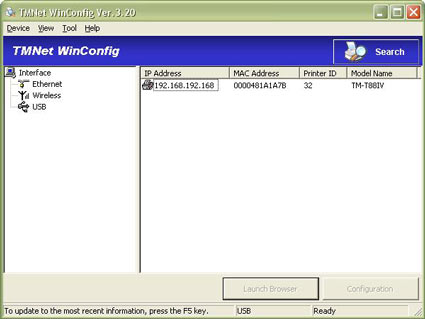
The utility will scan for and
will list the wireless printers.

Select the printer and press
Configuration to view or change settings.
When you make changes and press 'OK' the
utility sends the new settings to the printer and resets the printer. Note: the
default password is <blank>. Don't
forget to make the same changes on the computer side to maintain connectivity.
Installing the Printer Driver
in Windows
The printer drivers are available directly from the Epson Expert site (see
the instructions above). Select the
printer you are using to get the drivers to work with wireless adapter.
The printer should be visible in the printers folder of the Windows Control
Panel.
Configuring the Printer in
Windows
You need to make a few changes in the printer settings to get it to work
with the wireless adapter. Specifically you need to configure the port you are
using. Open the printer in the Windows Printer Folder. Select the Ports Tab.
Turn off bidirectional support, if enabled.
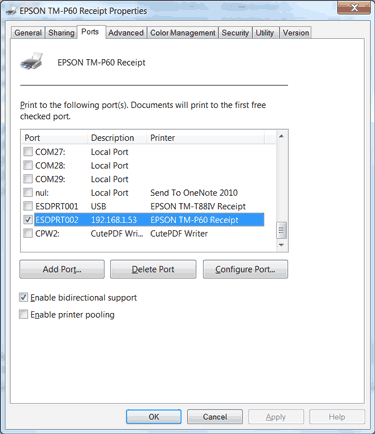
You must now add the port as s TCP/IP port. Press
"Add Port" and select "Standard TCP/IP Port" , then select "New
Port". This will open up the Add Standard TCP/IP Printer Port Wizard". Enter the
IP address of the wireless adapter (default: 192.168.192.168). The utility
will then locate the printer on the wireless network and create the port. This
port (IP_...) will now be selected fro use with this printer.
Testing the Printer
You should now be ready to test the printer by printing some text.
Troubleshooting
Connectivity Problems
-
The wireless adapter has not been configured to work on your
local network. Confirm network settings using the adapter
self test.
-
There is no wireless device for the adapter to talk to.
Check for the adapter's presence by looking for its IP address or MAC
address on the computer's wireless adapter or wireless router's listing of
active connections.
-
The computer is unable to connect to the printer over the
network. Test connectivity with ping and/or TMNet.
-
The IP address of the adapter has changed.
Check IP settings.
-
IP address setting is not correct. Confirm that the IP
address assigned by the network is set for the wireless adapter.
-
Subnet mask setting is not correct. Confirm that the subnet
mask assigned by the network is set for the wireless adapter.
-
The IP address is set redundantly. When the same IP address
is used for more than one device in the network, communication is not
possible. Confirm the settings for the other devices. The same default IP
address is set for all wireless adapter units as the factory setting. Do not
use more than one printer with the wireless adapter on the same network
without changing the IP address.
-
The Epson printer driver has not been installed for the
wireless adapter and printer in use.
-
The network mode is not correct. If the computer is in the
AdHoc mode, the wireless adapter must be in the AdHoc mode. If the computer
is in the Infrastructure mode, the wireless adapter must be in the
Infrastructure mode.
-
The network name (SSID) is not correct. In the AdHoc mode,
set the same value for the names of all PCs in the network and the network
name (SSID) for the wireless adapter. In the Infrastructure mode, set the
same value for the network name (SSID) as the name of the host computer in
the network. When the network authentication is set, set it to the same
setting as that of the host computer.
-
WEP key setting is not correct. If setting is not possible,
initialize the wireless adapter. Install the wireless adapter in the TM
printer, turn the power on, and press the Mode button of the wireless
adapter for more than three seconds to re-initialize the wireless adapter.
-
Channel setting is not correct. In the AdHoc mode,
communication is not possible when different channels are set for the
computer and the wireless adapter. Set the same channel for both of them.
Wireless Problems
The wireless adapter is out of the wireless communication range.
-
Move the wireless adapter near the access point or the
computer.
-
When TMNet is installed on the network computer, you can
measure the strength of the signal.
The Information-Signal Condition of the TMNet on the network
computer is “No Connection.”
There is interference with another network.
-
When there are more than one wireless LAN networks on the
same floor and the same channel is used, interference occurs. When the
channels are close to each other, interference may occur. In this case, the
channel setting needs to be changed on one device.
No longer prints
-
The TM printer is turned off. Turn on the TM printer.
Confirm the connection of the power supply unit or the voltage of the
commercial power.
-
The TM printer is offline. Turn the TM printer online.
-
The ERROR LED of the TM printer is on or flashing.
Remove the error cause.
-
The printing port of the driver on the computer side
is not specified correctly. Confirm the driver setting on the computer side.
-
The wireless adapter is out of the wireless
communication range. Move the wireless adapter near the access point or
computer.
-
The wireless LAN setting is not correct. Confirm that
the wireless LAN setting for the wireless adapter and the settings for the
access point and computer are correct.
Printing is slow
-
The strength of the signal is weak. When the strength of the
signal is weak, the communication speed goes down. Confirm the
Information-Signal Condition of the TMNet. When it is “Poor,” move the
wireless adapter closer to the access point or computer. When TMNet is
not installed on the network computer, you cannot measure the strength of
the signal, so just move the wireless adapter closer to the access point or
computer.
-
There are problems with the computer or network. Printing
speed may go down due to problems with the network system or applications.
Wireless Printers
Wireless Dongle
Wireless Interface Card
|