Epson TM-T20II/III Support Page
DIP Switch Settings there are
no DIP switch settings on the T20II. Instead the configuration is done via
memory switches
Epson TM series printers have a setup program built-in. Once active, menus are
printed and menu selection is made with the paper feed button You can enter the
Printer Setup menu by running the self-test, and then pressing the feed button
for more than 1 second. To run the self-test:
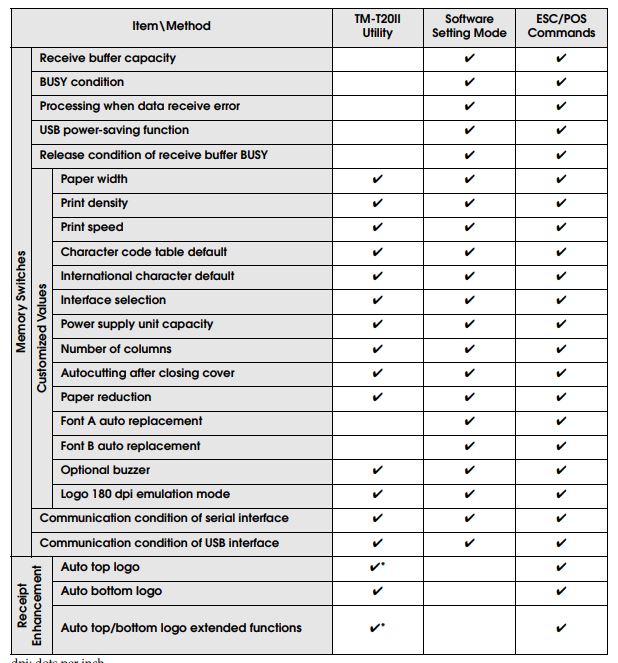
With the memory switch and R/E (receipt enhancement) function, which are
software settings
Use any of the 3 methods shown in the table below to make changes; TM-T20II
Utility, Software Setting Mode, or ESC/POS commands, to set memory switches and
R/E functions. Memory Switch Settings - how
to change.
To view or change Memory Switch Settings see
here.
For information about the TM-T20II Utility, see the TM-T20II Utility User’s
Manual.
For information about ESC/POS commands, see the Epson ESC/POS Quick Reference or
the Epson ESC/POS Command Reference, available from
Epson.
Configuring
Installed Interface The TM-T20II has permanent interfaces. Use the
memory switch settings to change the installed interface.
Serial Interface (memory switch menu)
Communication condition of serial interface
Transmission speed
• 2400 bps
• 4800 bps
• 9600 bps
• 19200 bps
• 38400 bps (initial setting)
• 57600 bps
• 115200 bps
[bps: bits per second]
Parity
• None (initial setting)
• Even
• Odd
Data bit
• 7 bits
• 8 bits (initial setting)
Flow control
• DTR/DSR (initial setting)
• XON/XOFF
Receive buffer capacity
• 4KB (initial setting)
• 45 bytes
BUSY condition
• Receive buffer full/Offline (initial setting)
• Receive buffer full
Processing when data receive error
• Prints “?” (initial setting)
• Ignored
Release condition of receive buffer BUSY
• Releases when the remaining receive buffer capacity becomes 256 bytes (initial
setting)
• Releases when the remaining receive buffer capacity becomes 138 bytes
USB Interface (memory switch menu)
Communication condition of USB interface
• USB printer class (initial setting)
• USB vendor-defined class
Interface selection
• UIB
• Ethernet
• Built-in USB
• Auto* (initial setting)
*
:The interface to which data is transmitted first is selected. Once the
interface is selected, the
selection is enabled until the power is turned off or the printer is reset. This
setting is valid for
models with UIB and built-in USB.
USB power-saving function
• Disabled
• Enabled (initial setting)
The USB power-saving function is valid only when the USB interface
communication
condition is set to the vendor-defined class and the system configuration is set
so that the
USB driver can support the USB power-saving function.
You can update the TM-T20II
(model xx7) firmware using this
utility from Epson:
https://support.epson.net/setupnavi/?PINF=swlist&OSC=WS&LG2=EN&MKN=TM-T20II
You can update the TM-T20III firmware using this
utility from Epson:
https://support.epson.net/setupnavi/?PINF=swlist&OSC=WS&LG2=EN&MKN=TM-T20III
Windows Drivers
The new TM-T20II includes a driver CD in the box. You can download printer
drivers from Epson as well. Installing the Device Drivers
for Windows
To obtain the latest Device
Drivers from Epson:
-
Download and Install Epson’s
drivers available from
www.epson.com
-
Select the printer model under the menu
-
Click the download
drivers on the printer page
|
