|
|
|
|
 |
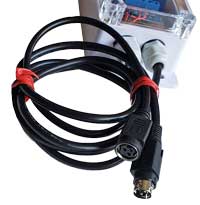
| The Beagle Hardware Print Alarm works as print alarm.
When plugged inline with a 24volt printer it
provides an audible alarm whenever a slip is printed (no cash
drawer required). It can also sound an external alarm ,
light a light or trigger external devices. With programmable intervals
and alarm modes it is our most versatile and useful alarm. |
Setup - Auto Sense
 |
Epson/Star
The buzzer is placed in line with the printer.
The buzzer simply plugs into the existing power supply connection and
then plugs into the power jack on the printer. |
|
|
Setting Changes

Available Alarm/Relay Functions
Changing the Settings
Your alarm should be preprogrammed to work with the most common printers. If you
want to change the settings please follow the directions below. Note that
support covers only units with the default settings.
Default settings: Program: P-11 High Current: .25 Low Current: .25
Step 1: turn power on. Alarm will beep.
Step 2: long press the SET key (K1) to enter the function to choose, displays P11-P52,
press K2 and K3 to adjust. Press K1 again to see or set the low current limit,
Press K1 again to see or set the high current limit. Press K1 again to return to
the normal measured current reading display. Note: there is no enter
button, settings are saved each time the K1 button is pressed after making
changes.
Not Standard Setting Instructions:
Power on, display the measured current; (if the measured current terminal is
none, the LED digits will pulse)
Press K1 for the first time (for over 1s to prevent mis-operation), the
screen shows: P11, K2 adjusts mode, K3 adjusts function
Press K1 for the second time, the screen flashes: 0.05, means the
threshold current value I1 is 0.05A, K2 increases low current value I1,
K3 increases I1
Press K1 for the third time, the screen flashes: 0.10, means the
threshold I2 is 0.1A; K2 increases I2, K3 increases I2
Press K1 for the fourth time, the screen shows the measured current ,
enters the standby state
Long press K2 or K3 in standby state to fine-tune the error of the measured
current
Available Programs:
P-11: (default) When the measured current ; I1(low limit current), the
relay closed; When the measured current ;I1, the relay opens;
P-12: When the measured current ; I1, the relay closes; Maintain the
state until the circuit board power off;
P-21: When the measured current ; I2(high limit current), the relay
closes; When the measured current ;I1, the relay opens;
P-22: When the measured current; I2, the relay closes; Maintain the state
until the circuit board power off;
P-31: When measured ; I1, the relay closes; When the current ;I2, the
relay opens;
P-32: When the measured current ; I1, the relay closes; Maintain the
state until the circuit board power off;
P-41: When the measured current is between I1 and I2, the relay closes,
opens in other cases;
P-42: When the measured current is between I1 and I2, the relay closes;
Maintain the state until the circuit board power off;
P-51: When the measured current ; I1 or ;I2, the relay closes, opens in
other cases;
P-52: When the measured current ; I1 or ; I2, the relay closes; Maintain
the state until the circuit board power off.
Specifications
1. working voltage: DC 24V
2. Load Power: DC 0~30V 10A / AC 0~220V 10A.
3. Detection range is DC 0-10A with the accuracy of 0.01A.
4. Static current: 15mA
5. Working current: 30mA
6. Service life: 100 thousand times;
7. Working temperature: -40~85℃;
8. Waterproof Level: IP66
9. Case Material: ABS V0
10. Transparent Cover Material: PC V0
11. Dimensions (L*W*H): 5.2 x 2.7 x 1.9 inch (132.2 * 68.7 * 50.1mm)
With error calibration function.
Can turn off the LED display to reduce power consumption.
|
|